Donate
| Chapter | 1. | INTRODUCTION | ||
| Purpose and Scope | 1 | 1 | ||
| Modification | 2 | 1 | ||
| Chapter | 2 | GENERAL CARE AND MAINTENENCE | ||
| Clothing | 3 | 2 | ||
| Boots, Shoes, and Insoles | 4 | 5 | ||
| Canvas Equipment | 5 | 5 | ||
| Web Equipment | 6 | 5 | ||
| Netting | 7 | 5 | ||
| Fasteners | 8 | 5 | ||
| Coated Items | 9 | 6 | ||
| Mess Gear | 10 | 6 | ||
| Canteen and Cup | 11 | 6 | ||
| Miscellaneous Equipment | 12 | 6 |

1 Purpose and Scope
This website provides a guide for the use, care, and maintenance of the clothing and equipment issued or sold to you for your personal use during the Vietnam war.
a. The manual includes general instructions for cleaning, pressing, mending, and storing items of the uniform. Uses of bivouac equipment such as the shelter half, sleeping bag, and poncho are discussed as well as the methods of assembling, ' packing, and using load-carrying equipment. The use and care of various items of field equipment issued to you for special purposes or missions are also discussed. General information, with appropriate references for specific information, is included on clothing you may use in arctic, tropical, and other special environments.
b. Appendix B provides information on the composition of the various uniforms you will wear. Manner and occasion for wearing the uniforms are prescribed in AR 670-5 and AR 670-30. Instructions for fitting your uniform are contained in TM 10-227 and TM 10-229, which describe the Army-accepted "concept of fit." Instructions for the display of your clothing and equipment are given in FM 21-13.
2 Modification
The information, procedures, and equipment described herein are current at the time of preparation. Changes in equipment will require changes or revision of the material presented. Field experience may also suggest modification. Users of this publication are encouraged to submit recommended changes and comments to improve it. Comments should be keyed to the specific page, paragraph, and line of the text in which the change is recommended. Reasons should be provided for each comment to insure understanding and complete evaluation. Comments should be submitted on DA Form 2028.
3. Clothing
It is your responsibility to keep your clothing in good serviceable condition. No matter how well your uniform fits, it will not continue to look its best unless it is kept clean, kept in good repair, and stored properly. Proper personal care while you are wearing your uniform is important. For example, if you carry large or heavy articles in your pockets, the tailored-in shape of your clothing will be destroyed quickly. You should follow closely the cleaning and care instructions that are attached to most garments. In many cases the label will also tell you what not to do.
a. Cleaning.
Brush clothing frequently. When possible, brush clothing outdoors in the sunlight. Brush and sun clothing before it is stored and when it is unpacked after storage. Clean clothing regularly when it is in use. Dirty clothing wears out rapidly because dirt cuts textile fibers and retains moisture from perspiration. Observe the following instructions when cleaning clothing:
(1) Wash cotton clothing, such as shirts, trousers, and socks, with soap or synthetic detergent and hot water.
(2) Wash untailored wool clothing, such as socks and glove inserts, in mild soap, or synthetic detergent, and lukewarm or cool water. Never use hot or boiling water. Stretch the items into shape while drying.
(3) Dry-clean tailored wool clothing, such as wool jackets and trousers. Do not wash ; washing affects tailored features.
(4) Spot clean clothing that is soiled or spotted by small stains. Remove stains or soil as soon as possible because the longer they remain, the more difficult they will be to remove. When removing stains, start at the center of the stain, and brush out toward the edges, decreasing the pressure. Instructions for removing various types of stains are shown in table 1. Appendix D provides more detailed instructions for removing stains from washable and non washable fabrics.
(5) Wipe coated clothing, such as ponchos and raincoats, with a clean cloth and wash them with water and a mild soap or synthetic detergent. Do not use cleaning fluid on coated fabrics.
(6) Wash synthetic fabric clothing, such as stretch-type socks and stockings, in mild soap or synthetic detergent, using lukewarm or cool water.
(7) Wash outer water-repellent garments by hand or machine. Rinse items thoroughly, but do not starch them. Restore water repellency by retreating with the standard water-repellent compound.
b. Pressing.
Press clothing after it has been cleaned and all spots have been removed. Do not press dirty clothing. Observe the following instructions when pressing clothing:
(1) Make certain the iron is not too hot ; use temperature settings on the iron as required for the type of clothing being pressed. Fabrics containing polyester fibers should be hand-ironed with the dial temperature set at the bottom of the "synthetic" position of the iron.
(2) Use a damp cloth between the iron and the fabric when pressing wool clothing.
(3) Dampen the surface of cotton clothing, and apply the iron directly to it.
c. Storing.
Observe the following instructions when storing , clothing:
(1) Make certain the clothing is clean.
(2) Brush, sun, and air-dry all wool and cotton clothing before storing to avoid mildew in humid weather. Do not fold clothing when wet. Do not place wet clothing in a bag or pack. Use naphthalene or mothballs to protect wool clothing in storage. To be effective, the clothing and naphthalene or mothballs must be in a closed container, not on an open shelf.
(3) Make certain that coated clothing is cool and dry before folding it for storage. When possible, fold so that a coated side will be against an uncoated side to avoid sticking. Make certain when packing coated clothing that it does not come in contact with sharp objects that may cause rips or tears. When possible, dust coated clothing with talcum before storing.
Table 1. Procedures for stain removal.
| NUM | Type of stain | Cotton fabric | Wool fabric | Synthetic fabric |
| 1 | Gravy | Rub stain with cold water; then place a pad or cloth underneath fabric to absorb stain, and rub stain with cleaning fluid. If any stain remains, dry the fabric and rub with a soap or synthetic detergent solution. Do not rub excessively, as this may damage the finish of the garment. | Same as procedure fir cotton fabric. | Sponge with cold or lukewarm water. If grease spot remains, launder washable materials in a soap or synthetic detergent solution, using warm water. Do not rub material. |
| 2 | Food | Dampen stained area with water. Apply soap or synthetic detergent solution (With ammonia, if available), tamp with brush, and flush with water. | Same as procedure for cotton fabric. | Same as procedure for gravy. |
| 3 | Milk | Same as procedure for food stain. | Same as procedure for cotton fabric. | Same as procedure for gravy. |
| 4 | Fruit or fruit juices | Use hot water and wash stain while still moist. | Flush stained area with luke warm water. Apply soap or synthetic detergent solution, tamp with brush, and flush out with water. (If available apply lemon juice or vibager, and flush thoroughly with water). | Same as procedure for gravy. |
| 5 | Grease or oil | Scrape off top stain, then saturate stained area with cleaning fluid, tamp with brush, and flush out with cleaning fluid. | Same as procedure for cotton fabric. | Scrape off top stain. Launder washable materials in a soap or synthetic detergent solution, using warm water. Do not rub material. |
| 6 | Blood | Flush and rub stained area with cold water; then wash stain with soap or synthetic detergent solution. | Dampen stained area with water. Apply soap or synthetic detergent solution (with ammonia if available), tamp with brush, and flush with water. | Flush stained area with luke warm or cold water, then using warm water; wash stain with a soap or synthetic detergent solution. If stain remains, sponge with hydrogen peroxide. (Do not use hydrogen peroxide or bleach on colored material). |
| 7 | Blood (dried) | Scrape off top of stain. Dampen stained area with cold water, apply soap or synthetic detergent solution (with ammonia if available), tamp with brush, and flush with water. | Same as procedure for cotton fabric. | Scrape off top of stain. Flush stained area with lukewarm or cold water; then using warm water, wash stain with a soap or synthetic detergent solution. If stain remains, sponge with hydrogen peroxide. (Do not use hydrogen peroxide or bleach on colored material). |
d. Repairing.
Repair holes and tears in your clothing as soon as possible. One method is to use quick stick-on patches. These patches provide a means for speedy repair of clothing, even while you are wearing it. When clothing is wet, first dry the area to be patched. To repair your clothing by sewing, proceed as follows :
|
(1) Rips and tears.
(a) To mend a ripped seam, place the two edges together and sew, keeping the stitches small and in line with those already made (figure 1). ( b) To mend a tear, place the two edges on the wrong (or inside) side, and sew together (figure 2). (c) To mend a frayed edge, turn the edge under, and sew. (2) Buttons. To replace buttons, refer to figure 3, and- (a) Thread a needle, and tie the ends of the thread together (A). (b) Put the needle through the cloth from the inside, and stitch several times to anchor the md of the thread (B). (c) Put the needle through one of the holes in the button, and let the button slide down he thread (C). (d) Stitch through the cloth and the holes the button, first through the holes on one side and then through those on the other. Hold the button out from the cloth while sewing ti prevent strain on the cloth. |
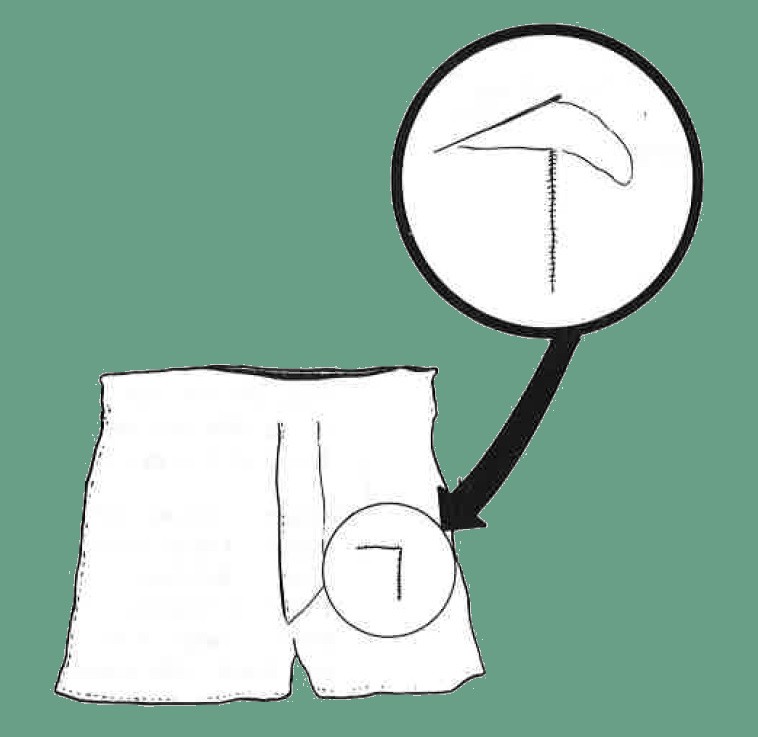
Figure 2. Mending a tear. |
(e) After sewing, wrap a few turns of the thread around the stitches between the button and the cloth, and stitch through the wrapped
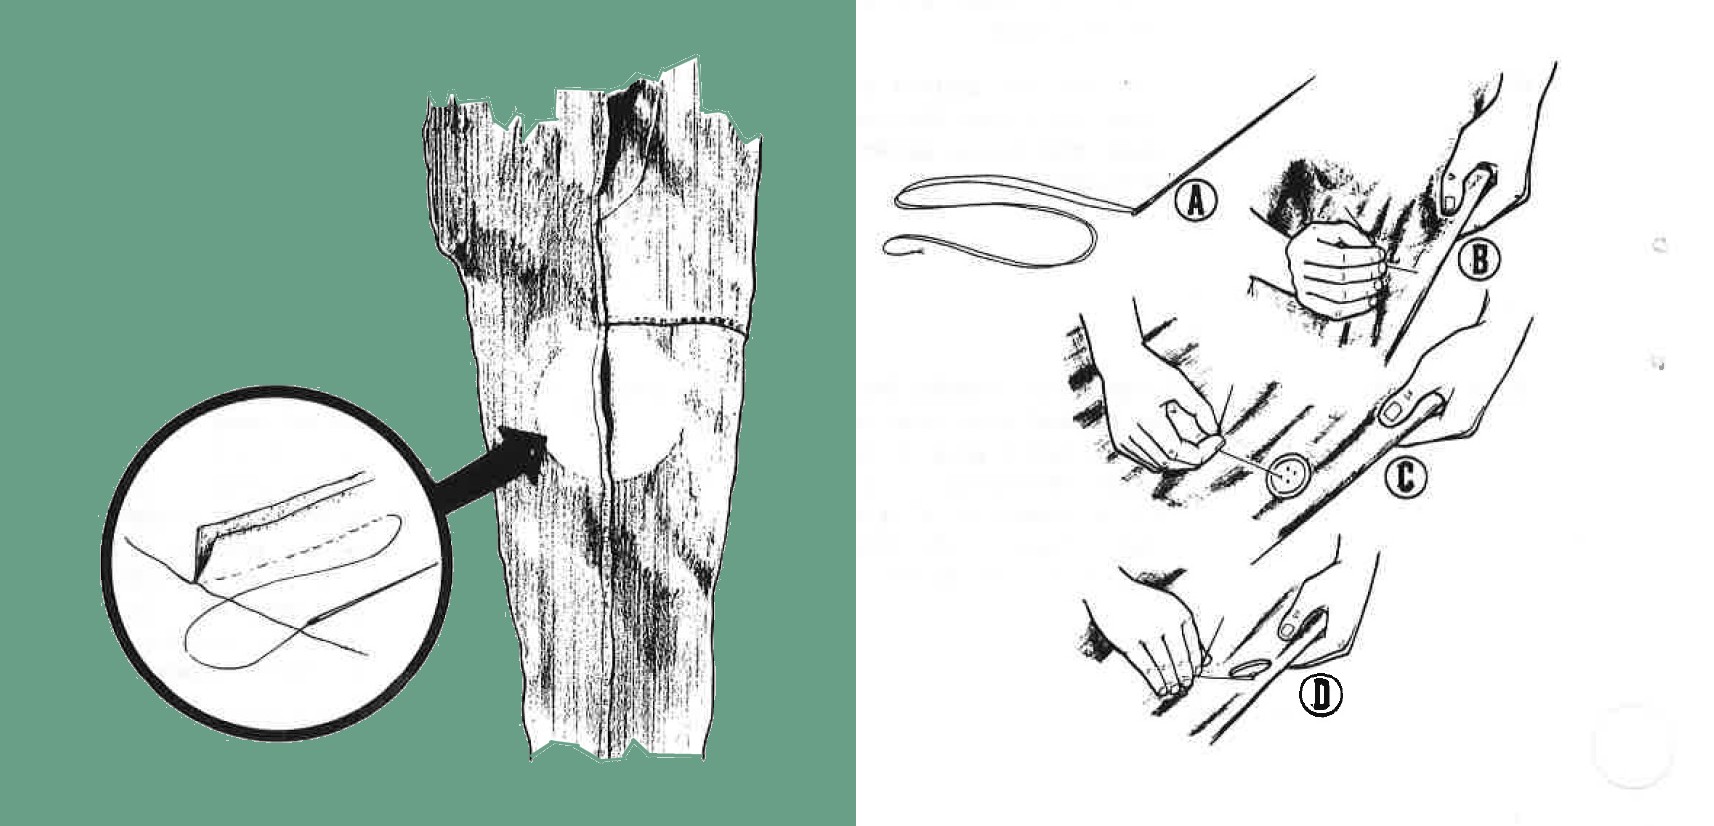
Figures 1 and 3. Mending a ripped seam ----------------------------- Sewing on buttons. |
Thread a number of times (D). To complete the operation, lock the stitches with a knot made on the inside of the cloth. |
4. Boots, Shoes, and Insoles.
A new pair of boots or shoes should not be fitted too snugly with the expectation that they will stretch. They should fit properly when new (TM 10-228). Because boots and shoes should have a chance to air between wearings, wear one pair one day and another pair the next. Wear the ventilating plastic insoles to allow air to circulate underneath your feet.
a. Cleaning and Drying.
Scrape dirt or mud from boots or shoes with a flat stick, brush, or dull instrument which will not cut leather or rubber. Using a small hand brush, wash with mild soap and very little water. Remove all soapsuds, and wipe the insides dry with a clean cloth. Stuff paper in the toes while the boots or shoes are still wet to keep the leather from shrinking out of shape. Dry the boots or shoes slowly in a warm dry place. Do not dry by exposure to hot sun, fire, or other strong heat, because such exposure may injure the rubber or leather. Rubbing saddle soap into the boots or shoes before they are completely dry will help to soften the leather. Wash the ventilating insoles with a warm solution of mild soap or detergent; do not boil the insole. Allow the insole to air-dry.
b. Polishing.
Use only stains and polishes that match the color of the boots or shoes.
c. Repairing.
The direct molded sole (DMS) boots and shoes are non repairable, except for the heels, which may be replaced. The heels should be replaced after wear of seven-sixteenths of an inch or more.
5. Canvas Equipment
a. Cleaning.
Clean soiled canvas items, such as bags and packs, by dipping them vigorously in a pail of warm water containing soap or synthetic detergent. This prolongs the life of the item and prevents discoloration If soiled spots remain after washing, scrub the spots with a white or colorfast cloth, using warm soapy water or synthetic detergent solution. Do not use chlorine bleaches, yellow issue soap, cleaning fluids, or dyes, as discoloration will result. Dry canvas items in the shade or indoors. Do not dry them in the sun because direct sunlight will discolor them. Note. Certain canvas items, such as the carrier for the field protective mask and the small arms ammunition case, may be provided with fiberboard or plastic stiffeners. Clean these cases with a damp soft brush and cool water only.
b. Repairing.
Repair small rips and tears as soon as they are discovered by following one of the procedures described in paragraph 3d.
6. Web Equipment
Clean web equipment in the same manner as canvas equipment. Do not use chlorine, yellow-issue soap, cleaning fluids, or dyes. Rinse all soap carefully from web equipment after washing, and stretch the item back to its original shape while it dries. Dry the equipment in the shade or indoors; never in direct sunlight. Do not launder or dry webbing in commercial or home-type automatic laundry equipment. Do not attempt to dye web equipment or to repair it. If it is damaged, turn it in for repair or replacement.
7. Netting
Wash netting with a warm solution of mild soap or detergent. Repair small tears and holes by placing pieces of adhesive tape or waterproof tape over both sides of each hole while netting is flattened out. Do not draw the edges of the hole together and tie, except in an emergency.
8. Fasteners
a. Snap Fasteners.
Always use care in opening snap fasteners. To open, place the thumb and forefinger between the two layers of cloth close to the fastener; then pry the ba1l and socket halves of the fastener apart. Do not tug at the cloth.
b. Slide Fasteners.
Even though slide fasteners (zippers) are of sturdy construction, they must be used carefully. When a slide fastener snags, do not yank or tug at it. Check the fastener; if a fold of fabric is pinched between the two halves of the track, unzip the fastener about an inch, smooth out the fabric, and try again. When the slide fastener works stiffly, rub a thin coating of wax or lead-pencil graphite on each side of the track, and work the fastener back and forth a few times. This procedure lubricates the fastener and allows it to open and close more easily. Close the fastener before washing the garment.
c. Hook-and-Pile Fasteners.
The hook-and-pile fastener is used as a closure or fastener for equipment and clothing. It is made up of two sections of tape. One section contains numerous small nylon hooks; the other section is a woven pile with many small nylon loops. When the two sections are pressed together, the loops on the pile tape are engaged by the hooks on the hook tape, resulting in a tight closure. The closure is disengaged by firmly pulling one tape section from the other. Clean the fastener by washing or brushing, as necessary.
9. Coated Items
a. Cleaning.
Wipe soiled coated items with a clean dry cloth, wash with water and a mild soap or synthetic detergent, and rinse thoroughly. Air dry the items; do not use direct heat as this will cause coated material to dry out and crack. Take special care to see that such substances as oil, grease, acid, or insect repellent are washed off as soon as possible.
b. Storing.
Store coated items as described in paragraph 3c.
10. Mess Gear
Your mess gear consists of the mess kit pan and the field mess knife, fork, and spoon. Clean the mess gear before eating; then dip it in boiling water for at least 3 seconds. Eating on mess gear on which grease or food particles have been left may cause serious illness or make the food less appetizing. After eating, clean mess gear by dipping it in a hot soap, or synthetic-detergent, solution. Use a brush, if available, to wash off food or grease; rinse thoroughly in clean boiling water. Air-dry the gear by swinging it back and forth until it is thoroughly dry. Never wipe mess gear with a wet cloth.
11. Canteen and Cup.
Your plastic (polyethylene) water canteen (fig 4) holds 1 quart. The olive-drab canteen which fits into the standard metal canteen cup, has a plastic screw cap with an attaching strap and is carried in the standard canteen cover (para 3ld(7)). Wash the canteen and cup with warm soapy water or synthetic detergent and rinse thoroughly; keep them drained and dry when not in use. Do not force the cap on the canteen; the plastic cap may split if not used properly. When required, replace the cap with the M-1 drinking device; this device allows you to drink water from the canteen while you are wearing a protective mask (para 42). Do not place the plastic canteen near an open flame or burner plate.

Figure 4. Plastic Water Canteen.
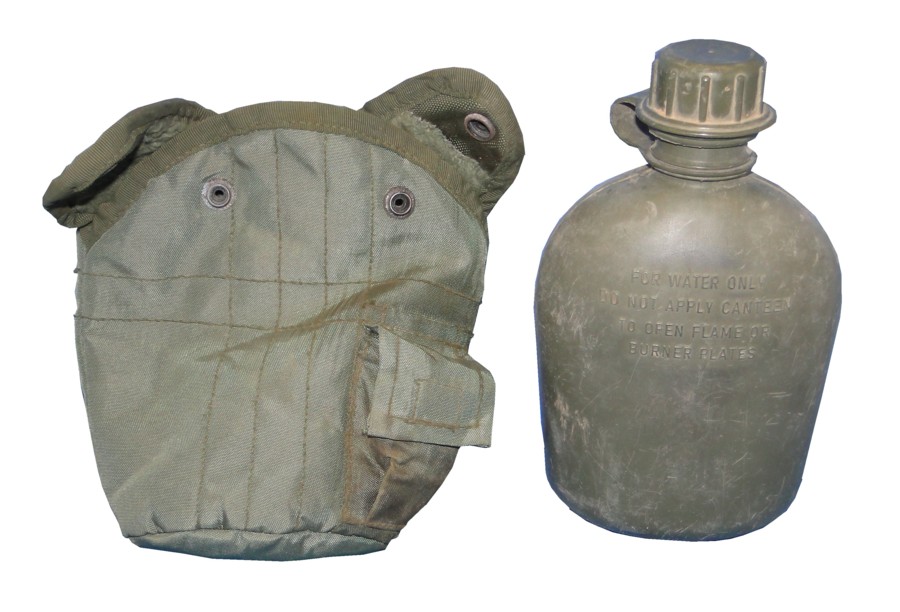
Figure 4a. Plastic Water Canteen and carrier.
12. Miscellaneous Equipment
a. Sunglasses.
Wipe your sunglasses with a non-scratchable material. To prevent sunglasses from becoming scratched or broken, put them in their case and pack them next to clothing or other soft material.
b. Pocket Knife.
Clean your pocket knife often. The metal carrying ring attached to it is large enough to slip over the handle of the mess kit pan so that the knife can be easily sterilized in boiling water. Sharpen the knife with a sharpening stone when possible. Dry the blades after each use, and oil the hinges and springs occasionally.